Pages

Tuesday, January 31, 2012

Caramel Cake

The Best Caramel Frosting Ever

1 small can Evaporated Milk
1 stick butter or margerine
1 cup tightly packed brown sugar (slightly more than 1 cup)
Combine in sauce pan and boil for 15 minutes, stirring. Careful not to burn. Cook the sugar down, carmelizing the ingredients.
Take the mixture and pour into meatl bowl. Use mixmaster or hand mixer and start adding in vanilla (she didn't give me an amount. Most of you bakers probably have an idea of how much to use. If you're like me, you can't ever have too much vanilla anyway!)
Add 1 box powdered sugar
Add maybe a 1/2 tsp water. Go slowly with the water. It only takes a minuscle amount and it's much easier to add than to remove (in fact, you can't remove) water. You might use up to 1 tsp. water.
Continue to beat while adding these ingredients until the frosting is fluffy and perfect ;)

*~*~SLURP!~*~*


Monday, January 30, 2012

Healthy Baked Chimichangas

Now, who loves Mexican food?? Get ready for…

Baked Chimichangas!

I love Mexican food and I am eternally trying to be a better ethnic cook. This recipe was sooo good. Another from the Better Homes and Gardens New Dieter’s Cookbook, this baked version of the chimichanga is less fattening than the ones in the restaurants but still full of flavor.

Baked Chimichangas

Use leftover roasted chicken or turkey or roast beef for this Mexican favorite.

8 ounces cooked meat (1 1/2 cups)
One 8-oz. jar salsa
One 16-oz. can fat-free refried beans
One 4 1/2-oz. can diced green chili peppers, drained
3 T. thinly sliced green onions
4-oz. reduced-fat Monterey Jack or cheddar cheese, shredded (1 cup)
Eight 8-to-9-inch flour tortillas
Additional:
Fat-free dairy sour cream (optional)
Salsa (optional)
Thinly sliced green onion (optional)

1. Using 2 forks, shred cooked meat. In a large skillet combine shredded meat, salsa, beans, chili peppers, and the green onions. Cook and stir over medium heat until heated through. Stir in cheese.

2. Meanwhile, wrap tortillas in foil; warm in a 350* oven for 10 minutes. For each chimichanga, spoon about 1/2 cup meat mixture on a tortilla, near 1 edge. Fold in sides; roll up.

3. Place in a 13x9x2-inch baking pan. Bake, uncovered, in a 350* oven for 15 to 20 minutes or until heated through and tortillas are crisp and brown. If desired, serve with sour cream, additional salsa, and/or green onion. Makes 8 servings.


Nutrition Facts Per Serving: 258 calories, 9 g total fat (3 g saturated fat), 37 mg cholesterol, 685 mg sodium, 28 g carbohydrate, 3 g fiber, 18 g protein.

Exchanges: 1 1/2 Starch, 2 Lean Meat, 1 Vegetable

Cost Per Serving: $ 1.04
2 chicken breasts: $2.73
8 tortillas $1.43
8 oz. Salsa $ .85
16 oz. Refried beans $ .99
4 1/2 oz. Green Chilis $1.59
4 oz. Shredded Cheese $ .49
1 Tbsp. Sour Cream $ .12
(1) Green onion $ .14

* I rolled up and baked 4 out of the 8 chimichangas and baked in an 8×8 pan because I was only feeding myself and the boys. I put the remaining meat mixture into a freezer bag, labeled it, and laid it flat to freeze in my deep freezer to make more at a later date.


Great Storage Tip # 49: ( <– haha. I just made that number up.) When freezing leftover chili, or in this case chimichanga mixture, fill quart or gallon bags, close tightly, then flatten out and lay flat in freezer to take up minimal space. Frozen food also defrosts faster when frozen and stored this way. Flattened bags of food stack easily in freezer, allowing for more space.

Sunday, January 29, 2012

Meatball Sub Cups & Butternut Squash Bake

Recently for dinner I made a fun version of the meatball sub. Now I'm not so great at making my own meatballs- I frequently use Harris Teeter's turkey meatballs. They are so tasty and easy. Whenever I want to make spaghetti and meatballs, or a meatball sub, I just open the package and put said frozen meatballs into a pot and simmer with a jar of red sauce. Perfection. I've also been known to throw meatballs into a crock pot with BBQ sauce to serve as appetizers. So whether you buy them premade or make your own, this meal is a winner.

I got the idea from Pillsbury.com. It's a Bake-Off winning recipe called Jumbo Burger Cups, which basically takes all your favorite burger fixins and encloses it all into a muffin-like cup. I saw that and thought "Awesome! I'm going to do that as a meatball sub!" And I did.

Meatball Sub Cups


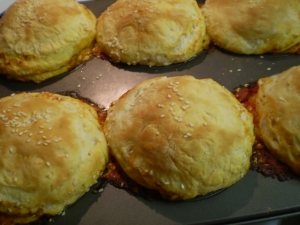
These were really yummy! Since I used a jumbo muffin tin, instead of cutting 6 biscuits in halves I used a dozen- 2 for each cup, a top and a bottom. The biscuits were thawed and flattened and placed into the muffin tin with the dough pushed up the sides to create a cup. I only used 1/2 a jar of red sauce to simmer the meatballs in because there really wasn't much room for extra sauce in the cups- though serving extra sauce on the side is an excellent idea. I then placed 2 meatballs into each cup and topped with a little shredded mozzarella cheese. provolone would work well, too. Place the second biscuit on top, sort of molded over to replicate a muffin top, and shake some sesame seeds to give it a "bun" appearance. Bake at 350* for 20 minutes.


Butternut Squash Bake

This recipe came from Better Homes & Gardens magazine. The recipe was split between pages and I did not save the very last bit of instructions, so when it came to cooking it I relied on my own experience. I assumed it should bake at 350* (doesn't everything?) and I eye-balled it to see when it was done. It took about 20-25 minutes to heat through, since everything was essentially already cooked.

Preheat oven to 425*. Peel, seed, and cube squash. Toss with olive oil and place into greased baking dish (recipe called for 1 1/2 lb. squash = 3 cups and a 15 x 10 inch pan. I used 2 small squashes, have no idea how many cups it was but it fit perfectly into a 8 x 10 pan.) Roast, uncovered for 30 minutes, until lightly browned and tender, stirring twice (I forgot to stir. Still came out okay.) Cook 6 oz. whole wheat, extra wide noodles according to package. Drain and set aside. In same pot melt 2 tbsp. butter and add 6 chopped shallots, cook for 3-5 minutes over medium heat until shallots are tender and butter is just beginning to brown. Stir in 1 tbsp lemon juice. Add noodles to shallots. Stir in 8 oz. mascarpone cheese, 1/2 cup parmesan, 1 tbsp dried parsley (or 1/4 cup fresh), and 1/4 tsp of salt and pepper, each. Stir until cheese is melted and all ingredients are blended. Add squash and combine everything. Transfer back into baking dish but make sure you've allowed the oven to cool down to 350* (I baked the meatball cups during this time). Top mixture with 1/4 parmesan cheese. Place dish in oven and bake for about 20 minutes or until heated through.


This was really, really good! I've never used mascarpone cheese before, and not sure I will again soon. It cost $5.79 for 8 ounces! I know there has to be a cheat out there somewhere with regular cream cheese, so if anyone knows it please share! I also had to buy the wide noodles. I could have used something else that I already had but I really wanted to experience this recipe the way it was written- and I wasn't disappointed.

Overall the added expense wasn't bad (except for paying almost $6 for an item when my weekly budget is $60.) I already had all the ingredients for the Meatball Cups (which is why I didn't mind using white flour biscuits- wanted to use them up in some way), and only had to buy pasta, shallots, and mascarpone cheese. I feed 5 people last night and still have 1 Meatball cup leftover and 1/2 pan of Butternut Squash Bake. So we're looking at 6 full meals, and about 3 other servings of the squash (about 10 total servings) all for $9.58. That's $.96 a serving. Yeah, I can live with that.

If you love butternut squash you will love this recipe! And if you are not sure if you would like butternut squash or not, this is the perfect recipe to start with. You can't loose! Happy eating!

Saturday, January 28, 2012

Welcome to Caprice's Kitchen!

I am so excited to be here and to start blogging. I am a self proclaimed foodie because I love to cook, eat, and feed other people. A little slice of love comes with every meal I prepare and I can't wait to get started.

This blog is a work in progress, so please be patient with me and PROMISE to come back soon! In the meantime, please check out the ABOUT tab, which tells you all about me and what you can expect from this blog ;)

Thanks so much for stopping by. I look forward to making lots of new blogging friends!

Blessings!
~Caprice